- Version
- 1.0 · 9 August 2026
- Scope
- Microsoft Entra ID with passkey profiles, generally available since March 2026. If your tenant still uses the older global FIDO2 configuration, step 1 covers the migration.
- Licensing
- Passkeys (FIDO2) are included in every Entra ID edition, including Entra ID Free. There is no extra licence to buy.
- Temporary Access Pass and the registration campaign don't require a paid licence either.
- Entra ID P1 or P2 is needed for only two things in this guide: the Conditional Access work in step 9 and the Usage & insights report in step 10.
- Roles required
- Authentication Policy Administrator for all policy configuration; Authentication Administrator to issue Temporary Access Passes; Conditional Access Administrator for step 9; Global Reader or Reports Reader for the reports.
- Prerequisites
- Windows 10 1903 or later (2004 or later on hybrid-joined devices); iOS 17 or later and Android 14 or later for passkeys in Microsoft Authenticator and in most third-party managers.
- Time needed
- 45 minutes to get the policy working in a test tenant. Production rollout is measured in weeks, not minutes.
Verified against Microsoft's official documentation in August 2026. Microsoft changes this configuration surface often: check the labels if your portal doesn't match.
TL;DR
The full guide runs to ten steps. If you just want the map:
- Passkeys (FIDO2) are included in every Entra ID edition, the free one included. You only need P1 or P2 for the conditional access in step 9 and the usage report in step 10.
- Configuration goes through passkey profiles, generally available since March 2026. If your tenant is still on the old global FIDO2 settings, step 1 covers the migration.
- The route: enable profiles, set a sensible default profile, create additional profiles per group, enable and assign targets, passkeys in Microsoft Authenticator, registration with external managers such as Dashlane, a temporary access pass to bootstrap, a registration campaign, conditional access requiring the passkey, and verifying the rollout.
- AAGUID restriction is the piece most people get wrong: it decides which key models you accept, and with physical security keys there's a peculiar case covered in step 3.
- You can have the policy working in a test tenant in about 45 minutes. A production rollout is measured in weeks.
Before you start
This guide covers the full configuration of passkeys in Microsoft Entra ID, from an empty policy to verifying the rollout. Three concepts are worth settling first, because everything below assumes them.
Device-bound versus synced passkeys
A device-bound passkey creates the private key inside one physical device and never lets it leave: a FIDO2 security key, or Microsoft Authenticator on a phone. Lose the device and you lose the credential.
A synced passkey is encrypted on the device and synced to a cloud provider, so it is available on every machine where the user has signed in to that provider. That's what iCloud Keychain, Google Password Manager, Dashlane, 1Password and Bitwarden do.
The practical difference is one of guarantees: synced passkeys don't support attestation, so Entra ID can't verify which vendor they came from or whether they're hardware-backed. Microsoft treats them as phishing-resistant, but with the same security posture as any unattested authenticator. This drives all of step 6.
What an AAGUID is
The AAGUID (Authenticator Attestation GUID) is a 128-bit identifier that each vendor supplies during registration to declare the make and model of the authenticator. It is the only mechanism you have for saying "in this organisation, only these keys and these managers are acceptable".
With attestation on, the AAGUID is a verified claim. With attestation off, it is a value the authenticator asserts and nobody checks: a policy guide, not a security control. Microsoft says so explicitly, and it is the most common trap in the whole rollout.
What this guide doesn't cover
- Windows Hello for Business, configured separately even though it is also a phishing-resistant credential.
- Admin provisioning of security keys through Microsoft Graph, still in preview.
- Guest users: Entra ID doesn't support passkey registration for guests, internal or B2B, in the resource tenant. If your scenario is external collaboration, this route isn't available yet.
Step 1. Enable passkey profiles
Until 2025 the FIDO2 policy was a single global block: one attestation setting and one AAGUID list for the whole tenant. Passkey profiles replace that with per-group rules, which is what lets you treat administrators differently from everyone else.
- Sign in to the Microsoft Entra admin center as at least an Authentication Policy Administrator.
- Browse to Entra ID › Security › Authentication methods › Policies.
- Select Passkey (FIDO2).
- In the banner at the top of the blade, select the link to opt in to passkey profiles.
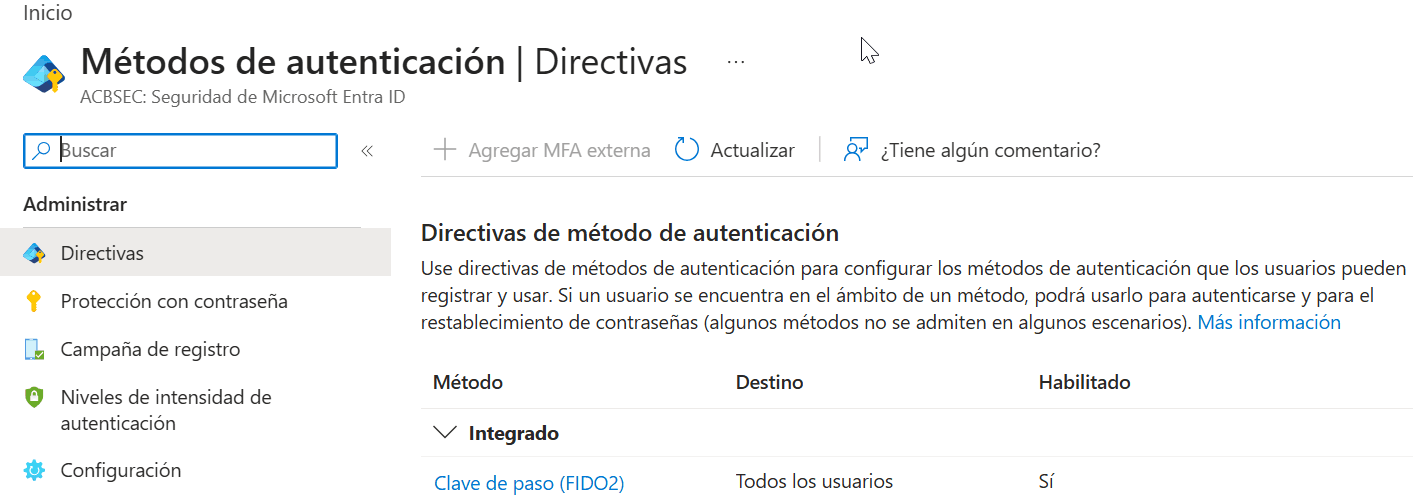
Opting in to passkey profiles can't be undone. When you enable it, your previous global configuration transfers automatically to a Default passkey profile, so nothing is lost, but the old model is gone for good.
Two limits worth knowing before you design anything:
- Up to 10 profiles are supported, including the default one. The portal states this on the Configure tab itself; the documentation still says three, so trust what's on screen.
- The passkey policy has a 20 KB size limit. For reference: the base policy is 1.44 KB, a profile with no AAGUIDs about 0.4 KB, and a profile with ten AAGUIDs about 0.3 KB. Only tenants with very long AAGUID lists get near the ceiling.
Step 2. Configure the default profile
Stay in Passkey (FIDO2), on the Configure tab.
- Set Allow self-service set up to Yes. If you leave it at No, users can't register a passkey from Security info even when the method is enabled. This setting is global: it doesn't live inside the profile.
- Open the Default passkey profile. It can't be deleted or renamed: the name field is greyed out.
- Under Passkey types, select the types you want to allow: Device-bound, Synced, or both.
- Save.
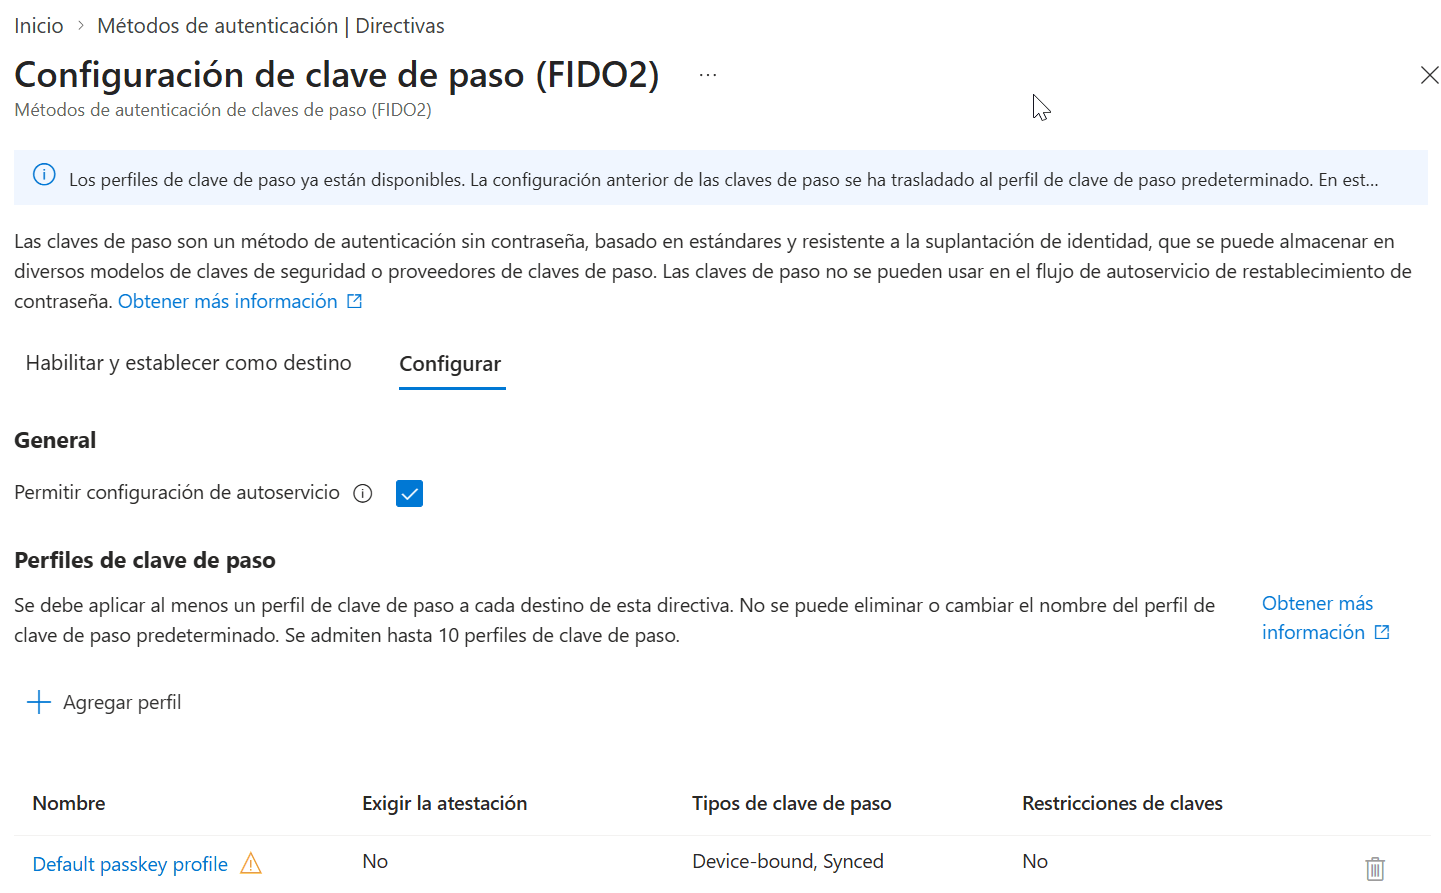
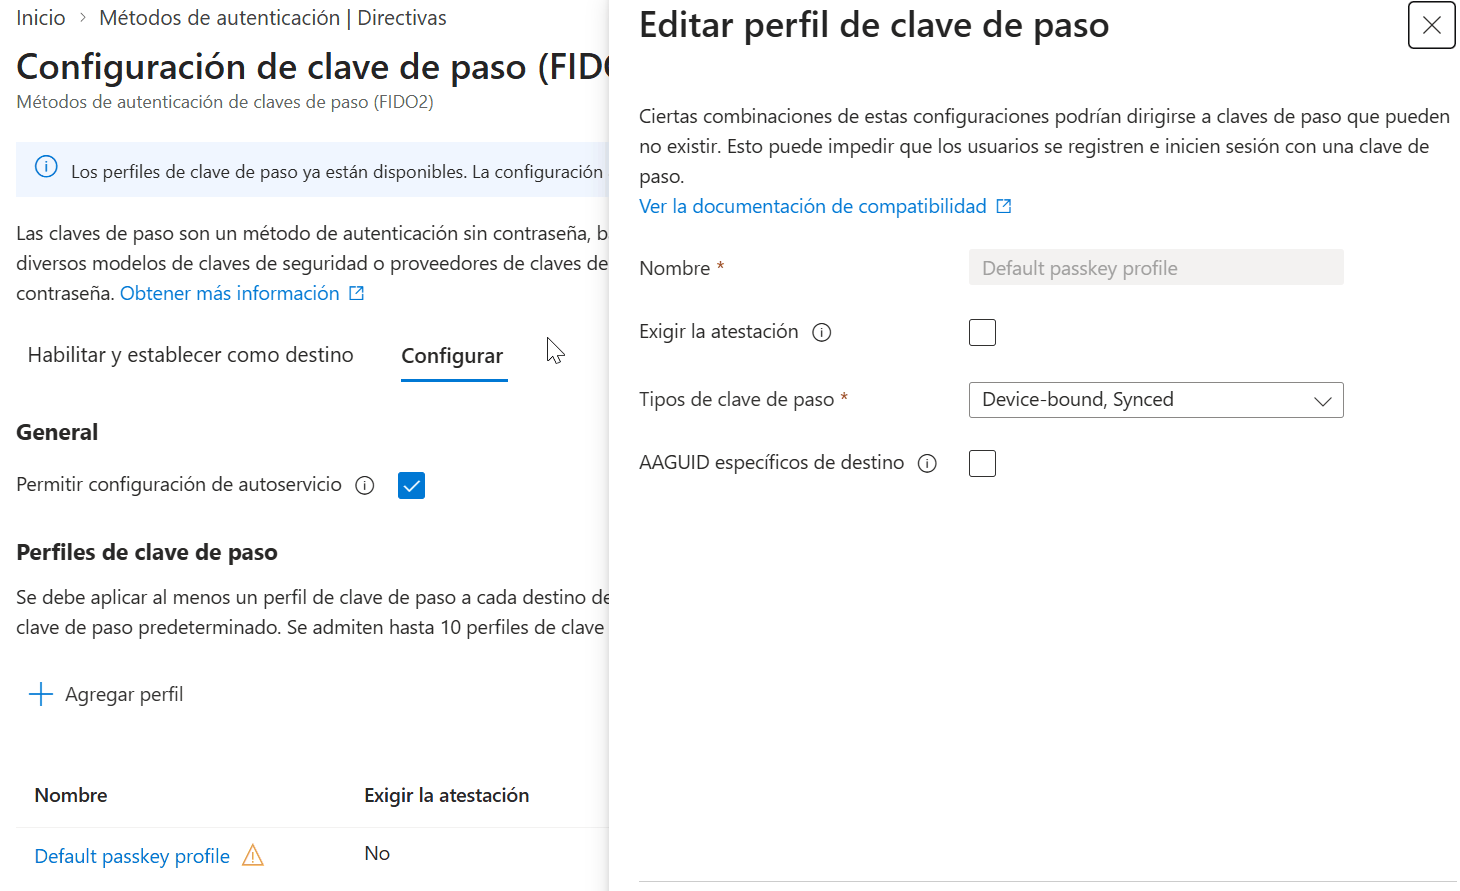
Keep the default profile permissive — both types, no attestation, no AAGUID restrictions — and create restrictive profiles for the groups that need them. The other way round, one change can block registration for the entire organisation, and the first sign of it is usually a queue at the service desk.
Step 3. Create additional profiles
From the same Configure tab, select + Add passkey profile. Each profile involves four decisions.
| Setting | Values | What it means |
|---|---|---|
| Name | Free text | Shown when you assign profiles to groups. Name it after the rule, not the group: one profile can end up applied to several groups. |
| Enforce attestation | Yes / No | With Yes, Entra ID verifies the authenticator's make and model against trusted metadata at registration time. With No, it can't guarantee any attribute of the passkey, not even whether it is synced or device-bound. |
| Passkey types | Device-bound / Synced | Synced passkeys don't support attestation. A profile with Synced and attestation enforced won't allow any synced passkey to register. |
| Target specific AAGUIDs | Checkbox + behaviour and list | Limits which specific models or providers are acceptable, by allowing or blocking them. Applies to registration and sign-in. In the profile table this column is labelled Key restrictions. |
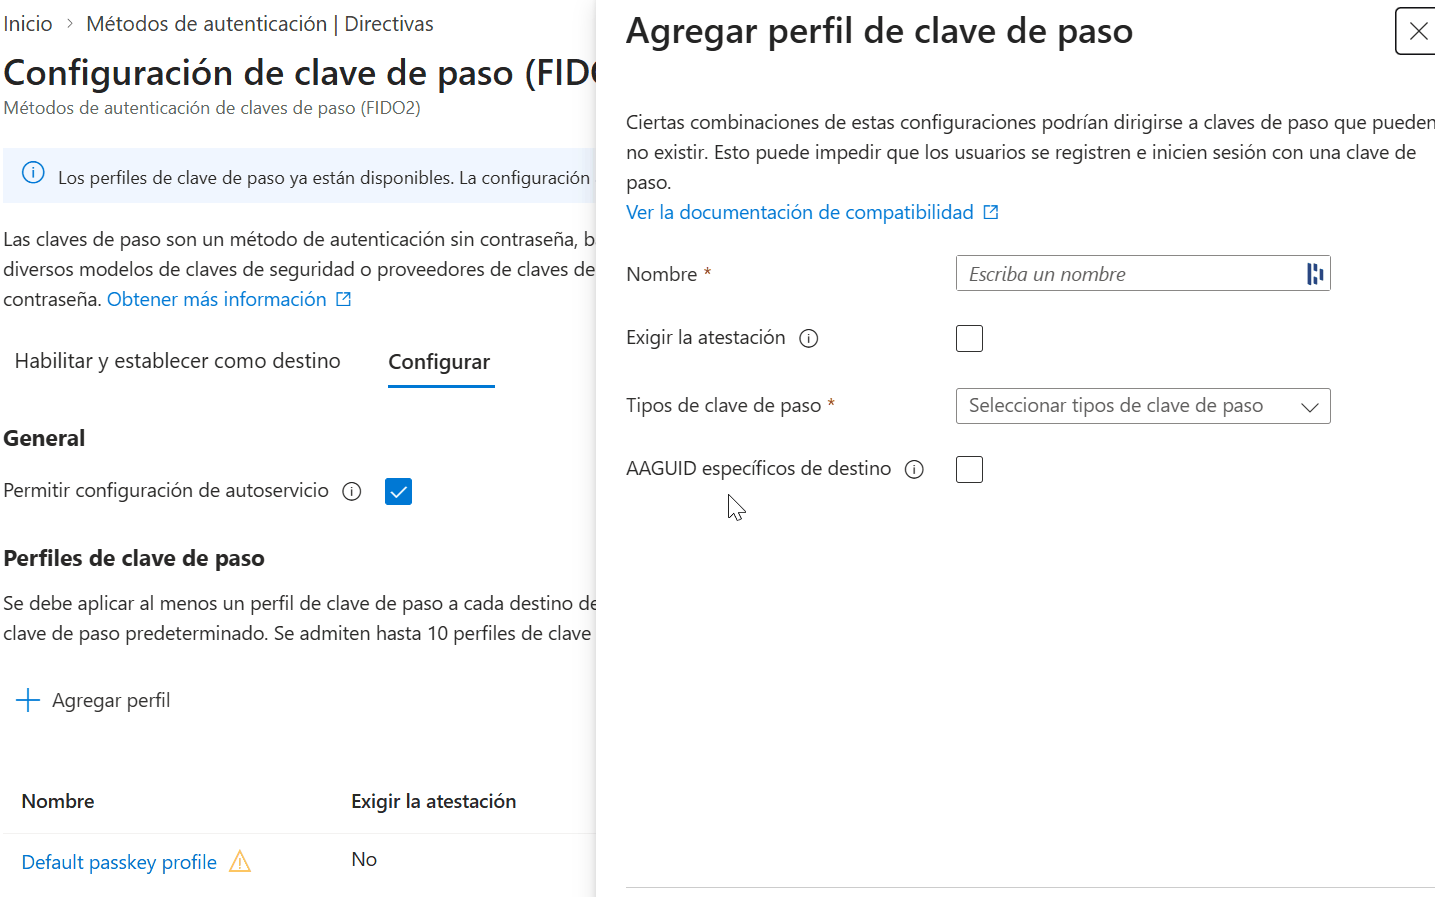
The dialog itself carries a warning worth reading slowly: certain combinations of these settings can target passkeys that don't exist, and then users can neither register nor sign in. A Synced profile with attestation enforced is exactly that case. When a combination looks suspect, the portal flags the profile with a warning triangle in the list.
Removing an AAGUID locks out anyone who already registered it. Key restrictions govern registration and authentication, so a user with that key registered can no longer sign in with it the moment you take it off the list. It isn't a rule for new credentials only.
Attestation is evaluated only at registration. If you turn Enforce attestation on later, users who already registered a passkey without attestation can still sign in with it. Tightening the policy doesn't clean up what's already registered: that has to be done by hand.
A profile design that works
This split covers most organisations with three profiles, and leaves plenty of room within the limit of ten:
| Profile | Target groups | Types | Attestation | Restrictions |
|---|---|---|---|---|
| Privileged accounts | IT admins, executives | Device-bound | Enforced | Only the AAGUIDs of corporate keys |
| General staff | All users | Device-bound and synced | No | None |
| Corporate manager | Password manager pilot group | Synced | No | Allow only the manager's AAGUID |
The underlying logic: the higher the privilege, the narrower the list of acceptable authenticators. For accounts that administer the tenant, a synced passkey in a commercial manager isn't where you want the credential to live.
Step 4. Enable and target
A profile does nothing until you assign it to someone. Go to the Enable and target tab.
- Check that Enable is On.
- Select Add target and choose All users or Select targets for specific groups.
- Select the profiles you want to apply to that target.
- Save.
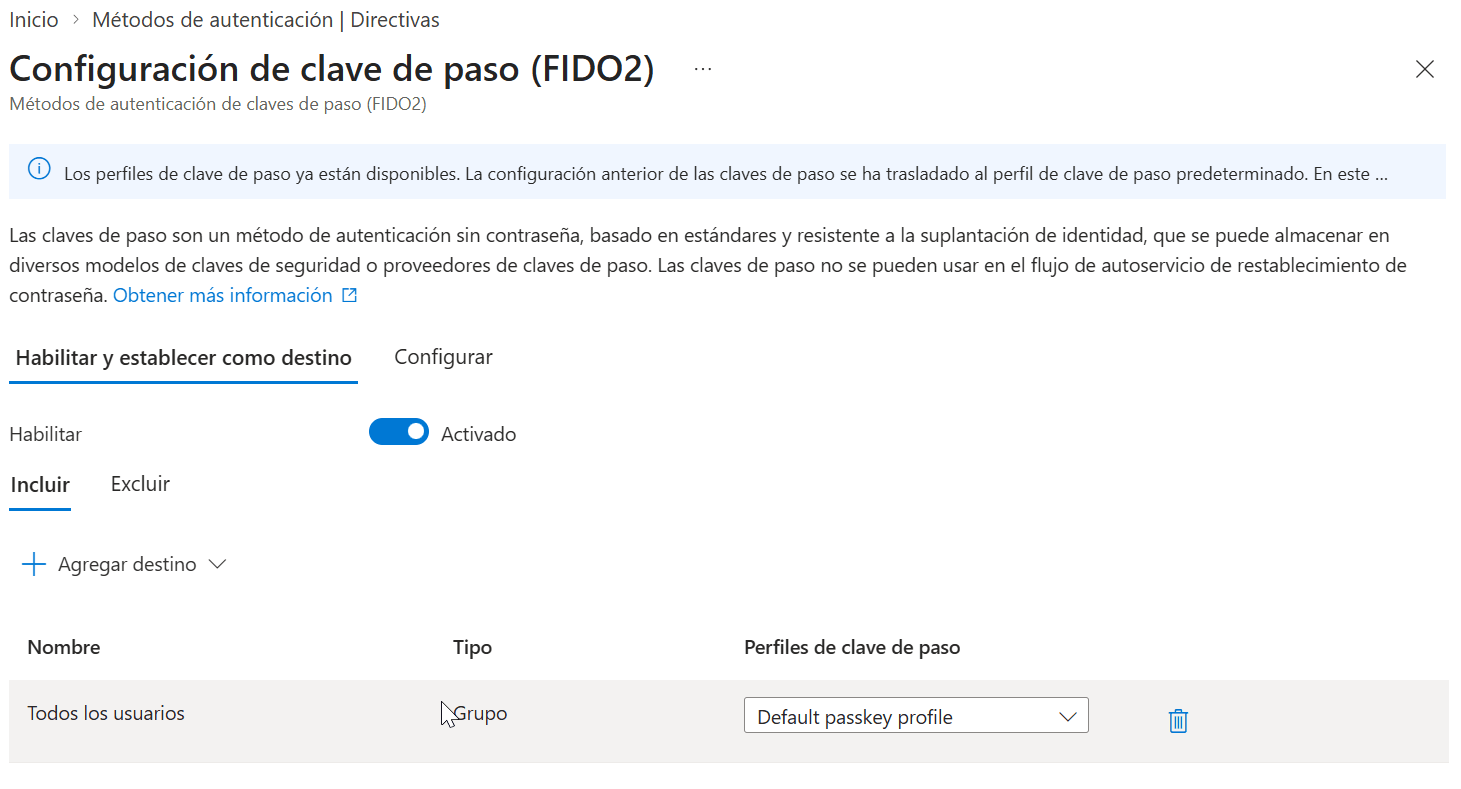
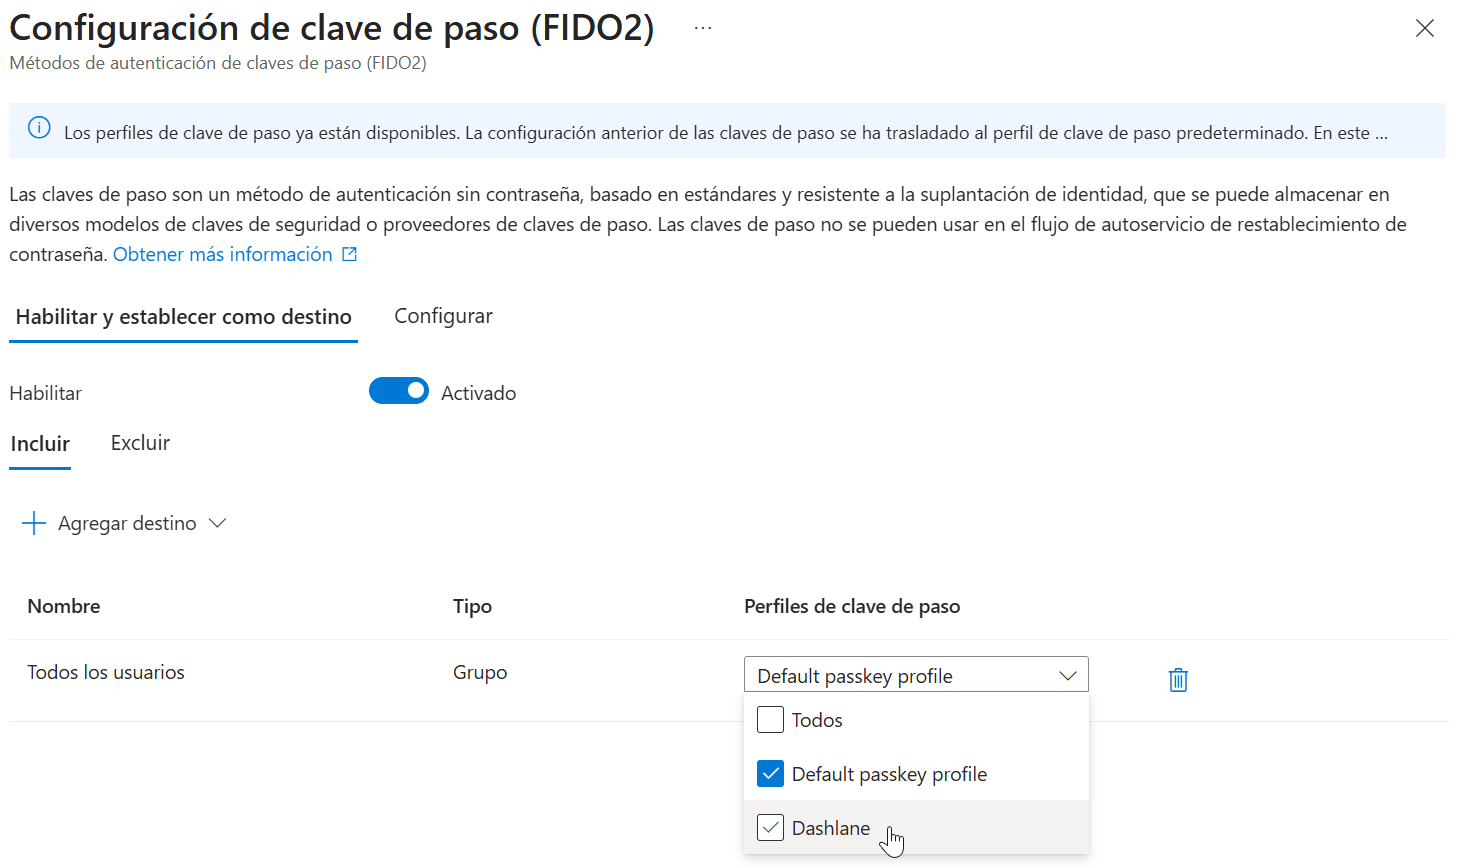
A group can be scoped to several profiles. When a user falls into more than one, registration and authentication are allowed if the passkey fully satisfies the requirements of at least one profile. There is no evaluation order and no priority.
Exclusion beats everything else: a user in an excluded group of the Passkey (FIDO2) policy is blocked from registering and signing in with passkeys entirely, even if they're included elsewhere.
And a rule the portal states plainly: every target in the policy must have at least one profile applied. A group with no profile isn't permissive, it's unconfigured.
Step 5. Passkeys in Microsoft Authenticator
Authenticator stores device-bound passkeys, and it's the sensible default for staff with a corporate phone: no hardware to buy and no third-party manager to procure.
- On Configure, add a profile and name it something like Authenticator passkeys.
- Decide whether to enforce attestation (there's an important caveat below).
- Under Passkey types, select Device-bound.
- Turn on AAGUID restrictions and set the behaviour to Allow.
- Select + Add AAGUID and pick Microsoft Authenticator from the list, or enter the identifiers manually.
| App | AAGUID |
|---|---|
| Authenticator for Android | de1e552d-db1d-4423-a619-566b625cdc84 |
| Authenticator for iOS | 90a3ccdf-635c-4729-a248-9b709135078f |
How the user registers it
There are two routes, and it's worth deciding which one you communicate so they don't get mixed up.
From the browser. In Security info, Add sign-in method and then Passkey in Microsoft Authenticator. The wizard restates the requirements — Android 14 or iOS 17 minimum, app up to date — and offers a link to add the account first if it isn't there yet.
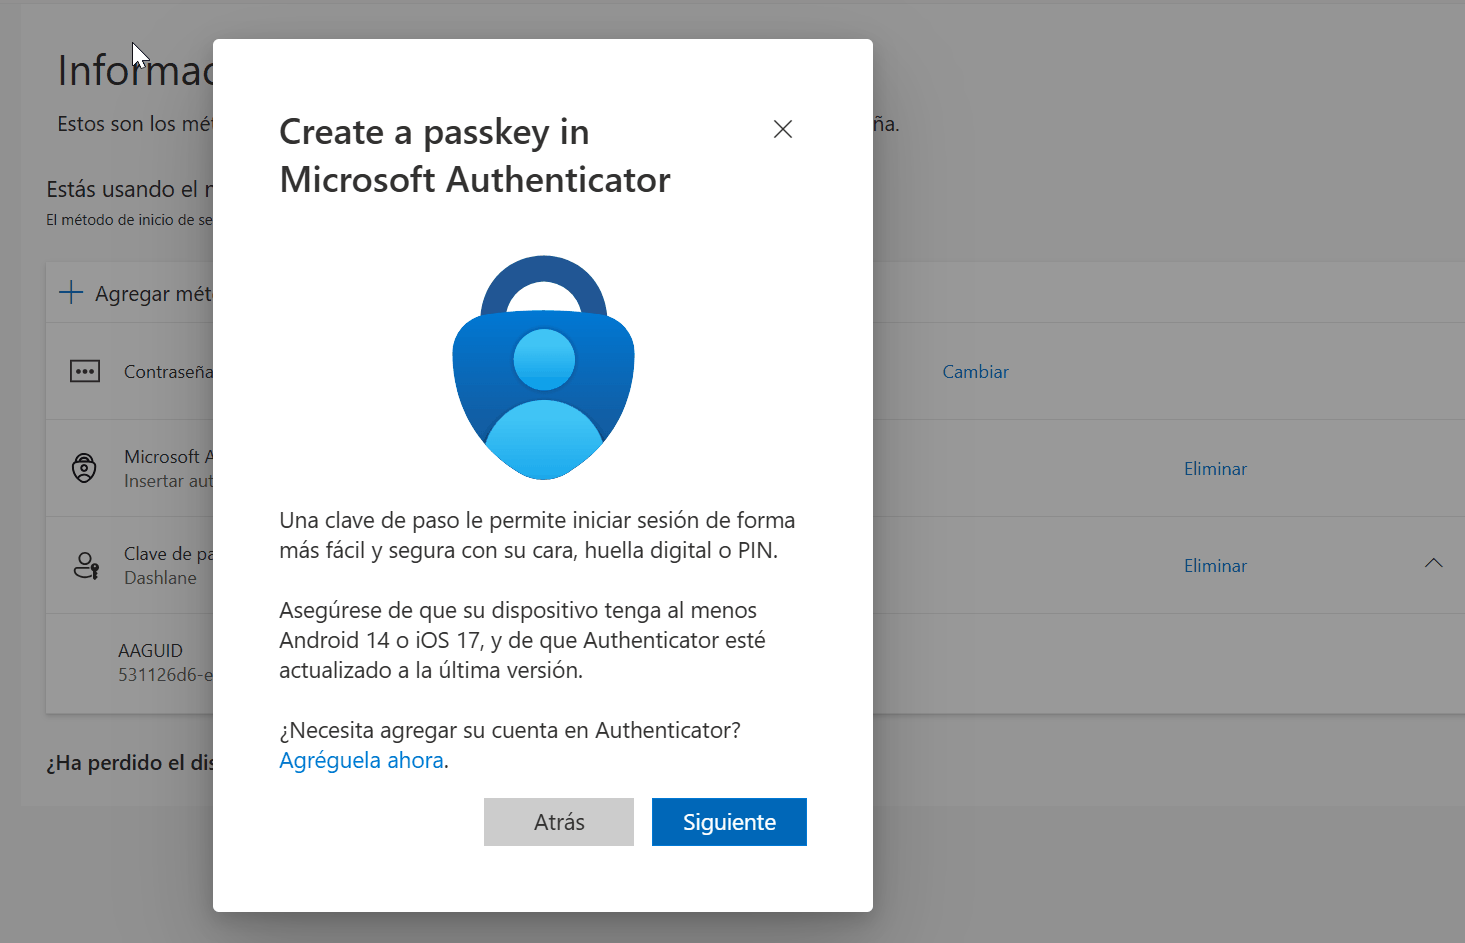
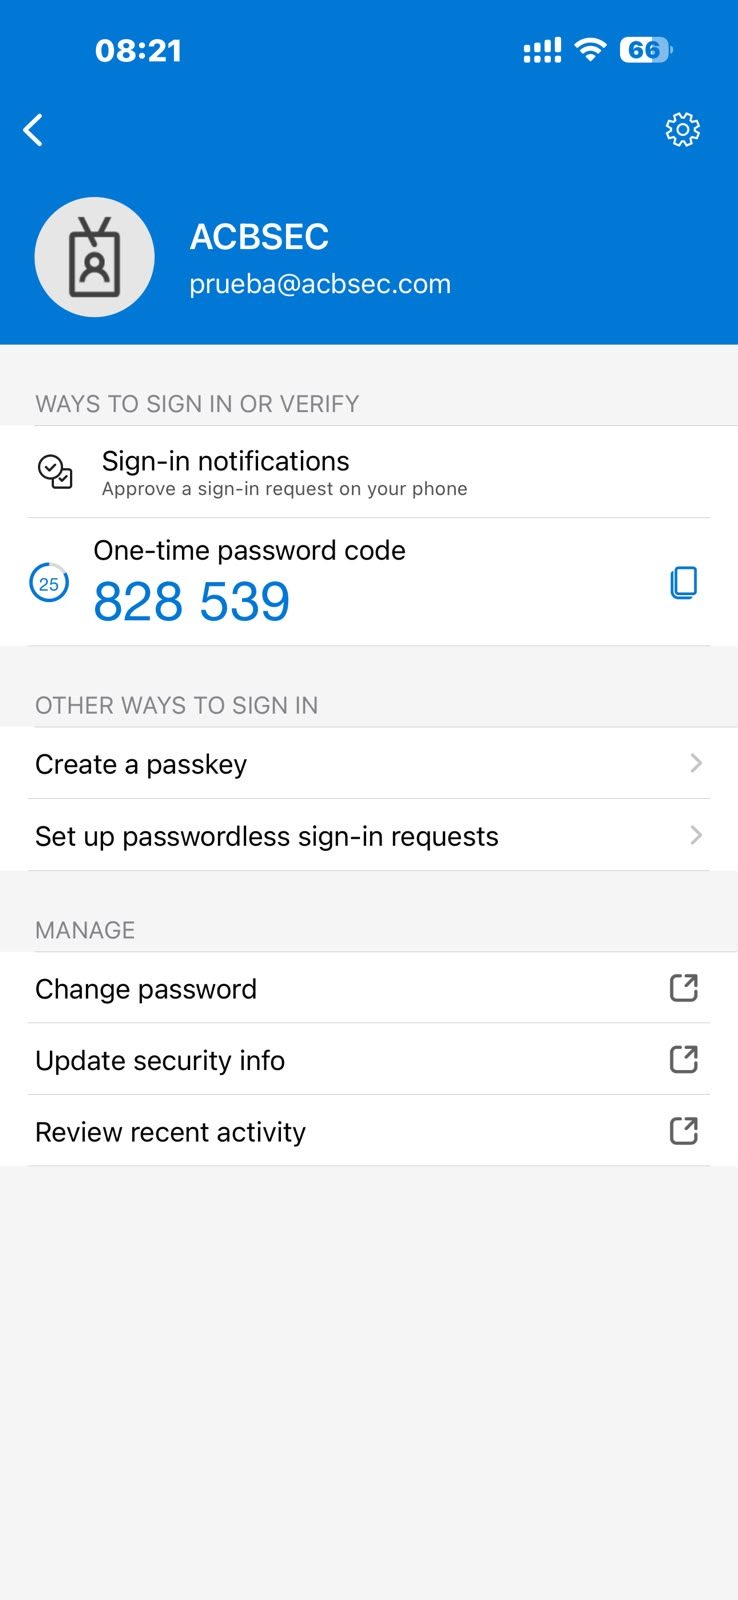
From the app itself. Open the account in Authenticator and, under Other ways to sign in, tap Create a passkey. This is the mandatory route when you enforce attestation, because cross-device registration isn't available then.
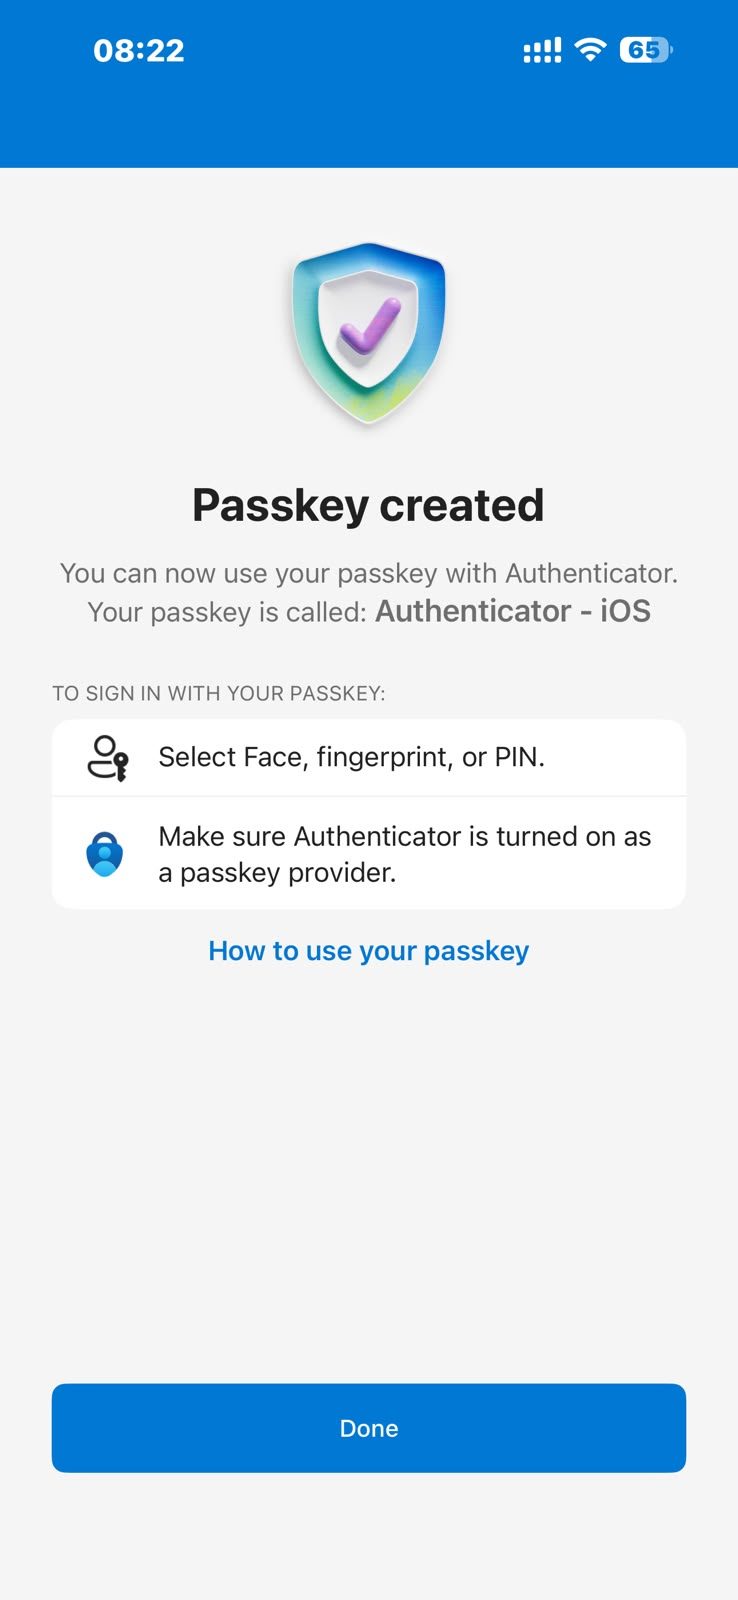
When it finishes, the app confirms and names the passkey after the device, along the lines of Authenticator - iOS. That same screen carries a warning worth heeding: Authenticator has to be switched on as a system passkey provider. Without that, the passkey exists but the system never offers it at sign-in, and the user concludes registration failed.
Version requirements: Android 14 or later, iOS 17 or later. If a profile allowing both passkey types targets Authenticator, users also need Authenticator iOS 6.8.37 or Android 6.2507.4749 as a minimum.
With attestation enabled, cross-device registration stops working: the user can only register the passkey directly in the Authenticator app, not by scanning a code from their laptop.
Authenticator attestation also depends on Apple and Google services (App Attest, Play Integrity). If those services fail or are under heavy load, registration fails for the duration. It's an external dependency worth knowing about before enforcing attestation across the workforce.
Cross-device registration needs Bluetooth and an internet connection on both devices, plus access to cable.ua5v.com on Android or cable.auth.com and app-site-association.cdn-apple.com on iOS. Organisations that block Bluetooth can permit pairing exclusively with FIDO2 authenticators.
Step 6. Registering third-party managers such as Dashlane
This is the section that generates the most questions, because three layers have to line up: the Entra policy, the operating system or browser, and the manager's own app.
6.1. Configure the profile in Entra ID
Dashlane, 1Password and Bitwarden store synced passkeys. Two rules follow from that, with no exceptions:
- The profile must include Synced in the passkey types.
- Enforce attestation must be No. Synced passkeys don't support attestation: with it on, registration always fails, and the message the user sees doesn't explain why.
To allow one specific manager and only that one, turn on key restrictions, set the behaviour to Allow and add its AAGUID:
| Provider | AAGUID | Passkey type |
|---|---|---|
| 1Password | bada5566-a7aa-401f-bd96-45619a55120d | Synced |
| Bitwarden | d548826e-79b4-db40-a3d8-11116f7e8349 | Synced |
| Apple Passwords (iCloud Keychain) | fbfc3007-154e-4ecc-8c0b-6e020557d7bd | Synced |
| iCloud Keychain (Managed) | dd4ec289-e01d-41c9-bb89-70fa845d4bf2 | Synced |
| Dashlane | 531126d6-e717-415c-9320-3d9aa6981239 | Synced |
| Enpass | f3809540-7f14-49c1-a8b3-8f813b225541 | Synced |
| Google Password Manager | ea9b8d66-4d01-1d21-3ce4-b6b48cb575d4 | Synced |
| Kaspersky Password Manager | a10c6dd9-465e-4226-8198-c7c44b91c555 | Synced |
| KeePassXC | fdb141b2-5d84-443e-8a35-4698c205a502 | Synced |
| Keeper | 0ea242b4-43c4-4a1b-8b17-dd6d0b6baec6 | Synced |
| LastPass | b78a0a55-6ef8-d246-a042-ba0f6d55050c | Synced |
| Microsoft Password Manager | d3452668-01fd-4c12-926c-83a4204853aa | Synced |
| NordPass | b84e4048-15dc-4dd0-8640-f4f60813c8af | Synced |
| Norton Password Manager | fa37f553-f9b6-4adb-ac53-8bbb57ebdf0d | Synced |
| Proton Pass | 50726f74-6f6e-5061-7373-50726f746f6e | Synced |
| Samsung Pass | 53414d53-554e-4700-0000-000000000000 | Synced |
| Sticky Password | d9be9d39-e6a6-4c28-a581-32b044d986e4 | Synced |
| Zoho Vault | b35a26b2-8f6e-4697-ab1d-d44db4da28c6 | Synced |
| Windows Hello (hardware-backed) | 6028b017-b1d4-4c02-b4b3-afcdafc96bb2 | Device-bound |
| Windows Hello (VBS) | 9ddd1817-af5a-4672-a2b9-3e3dd95000a9 | Device-bound |
| Windows Hello (software) | 08987058-cadc-4b81-b6e1-30de50dcbe96 | Device-bound |
| Chrome on macOS | adce0002-35bc-c60a-648b-0b25f1f05503 | Device-bound |
| Edge on macOS | 771b48fd-d3d4-4f74-9232-fc157ab0507a | Device-bound |
| Chromium browser (generic) | b5397666-4885-aa6b-cebf-e52262a439a2 | Device-bound |
Password managers and platform providers are the easy case: each declares one AAGUID and it stays put. Physical security keys are considerably messier, and it pays to know that before building a list.
Every model, firmware version, connector and commercial profile declares its own identifier. The FIDO Alliance metadata service, which is the authoritative catalogue, currently lists 337 authenticators with an AAGUID, and Yubico alone accounts for 80 of them: 31 in the YubiKey 5 Series, 17 in the Bio Series, 14 in the 5 FIPS Series and 14 in the Security Key family. Feitian adds 18 and HID Crescendo 14.
So allowing "the YubiKey" by copying a single identifier from some article locks out most of your fleet. With key restrictions enforced, that means people who can neither register nor sign in.
For physical keys there are three sensible ways to build the list, from most to least convenient:
- The portal's own picker. Inside the profile, + Add AAGUID offers the providers Microsoft already knows about. Check there first.
- Register one unit of each model you buy. Register it on a test account and read the identifier in Security info or on the user's authentication methods. Tedious, but exact, and it reflects your actual fleet rather than the global catalogue.
- The FIDO Alliance metadata service. It publishes the full catalogue with the AAGUID and description of every certified authenticator. It's the source the other lists draw from, and the one to cite if anyone disputes an identifier.
One procurement tip: ask the vendor for the AAGUID list of the models they are selling you, in writing, before signing. They hand it over without fuss and it saves discovering it key by key.
With attestation off — the only possible setting with synced managers — the AAGUID is a value declared by the authenticator itself, unverified. It steers the policy and stops staff registering something random by accident; it does not stop a determined user from using another provider.
If you need a real guarantee about where a credential came from, the route is enforced attestation with device-bound passkeys. It's worth saying that plainly when someone from compliance asks what the AAGUID list assures.
The identifiers above come from the community AAGUID list and Microsoft's documentation, verified in August 2026. Vendors can add new ones over time, so they are worth rechecking whenever a new provider enters the organisation.
6.2. Enable the manager in the OS or browser
This is where most trials stall. Even with a correct Entra policy, the manager won't appear as an option when creating the passkey unless the operating system or browser has it registered as a passkey provider. This is a step the user takes on their machine, not one the administrator takes in the portal.
Browser extension
Dashlane integrates as a passkey provider through its extension. The vendor's general requirement: one of the last two major versions of the browser.
On macOS it can also register as a system provider under Settings › Passwords › AutoFill, after which it appears in the native dialog as well as in the browser.
AutoFill provider
On iOS 17 or later: Settings › Passwords › Password Options, enabling Dashlane as an autofill source.
On Android 14 or later: system settings, passwords and passkeys service, selecting Dashlane. Dashlane requires Android 14 for passkeys even though its app runs from Android 10.
6.3. User registration
With the policy and the provider ready, the user does this:
- Go to Security info.
- Select Add sign-in method.
- Choose Passkey, the option described as "Sign in with your face, fingerprint, PIN or security key".
- Complete multifactor authentication. This is mandatory: MFA must have been completed within the past five minutes to register a passkey.
- Microsoft shows Setting up your passkey… and hands over to the system. Dashlane then appears with its own window asking to create a new passkey for the account. Select Confirm there.
- Return to the Microsoft wizard, select Next and give the passkey a recognisable name.
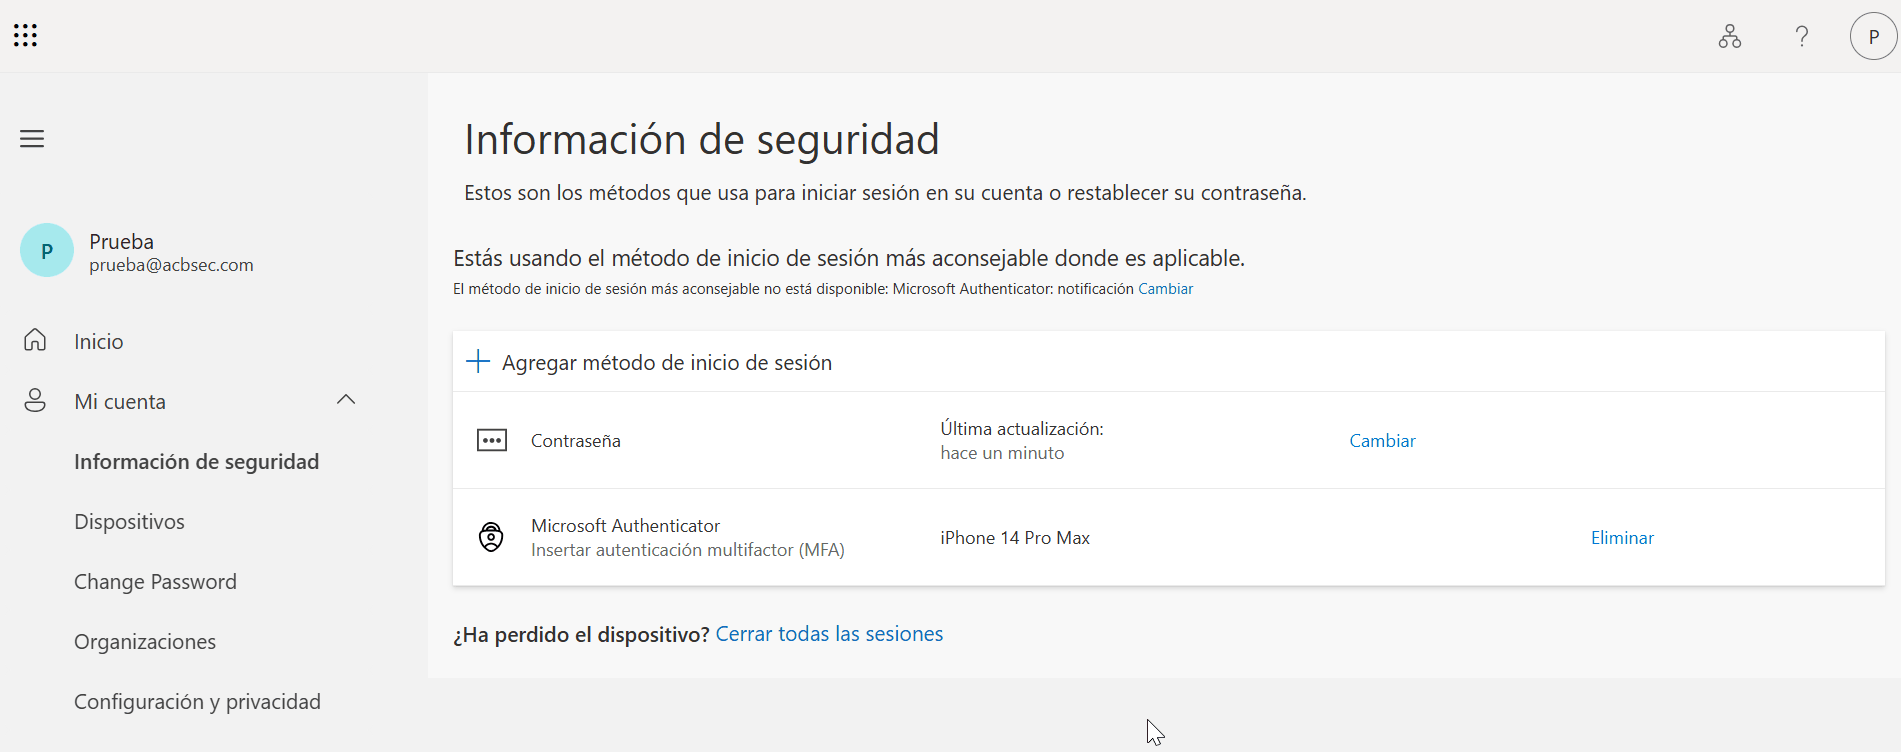
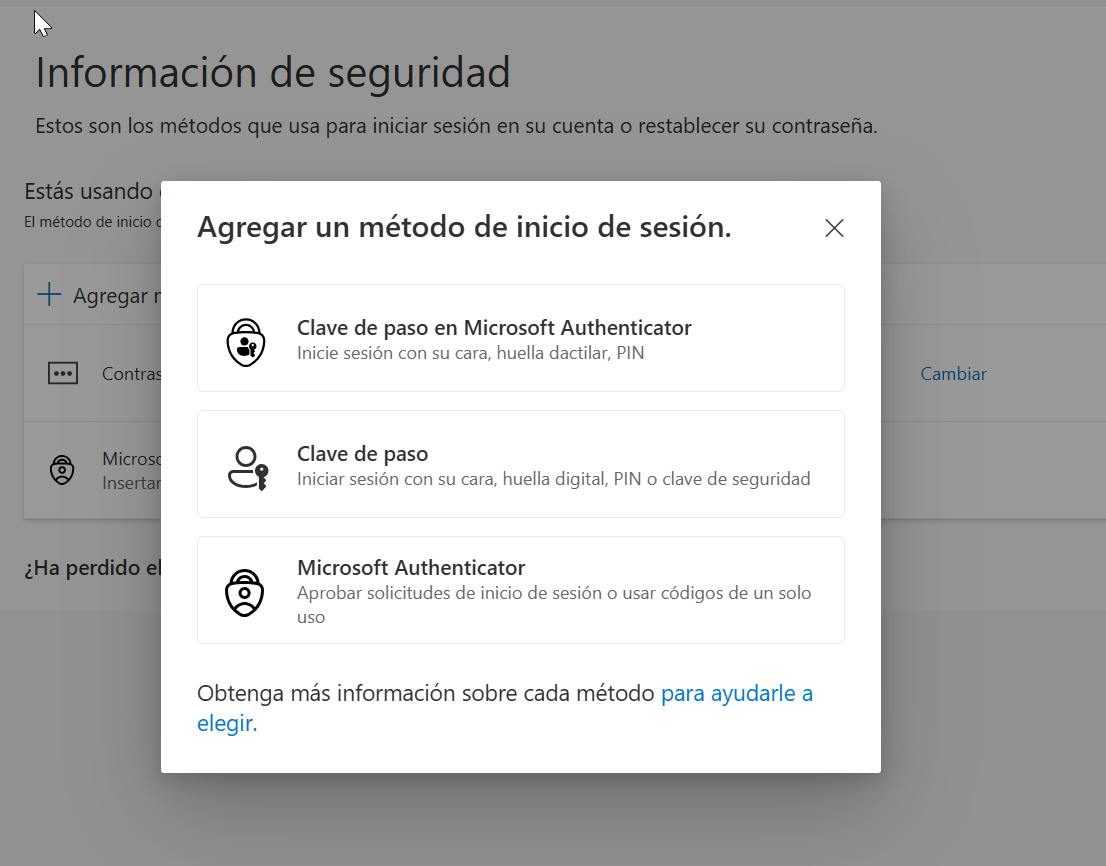
The Add a sign-in method menu offers "Passkey in Microsoft Authenticator" and "Passkey", and they don't lead to the same place.
The first starts the Authenticator-specific wizard and gives no choice of provider. To register in Dashlane — or any third-party manager — pick the second one, plain "Passkey". It's the easiest mistake to make in the whole process, and the message that follows doesn't help identify it.
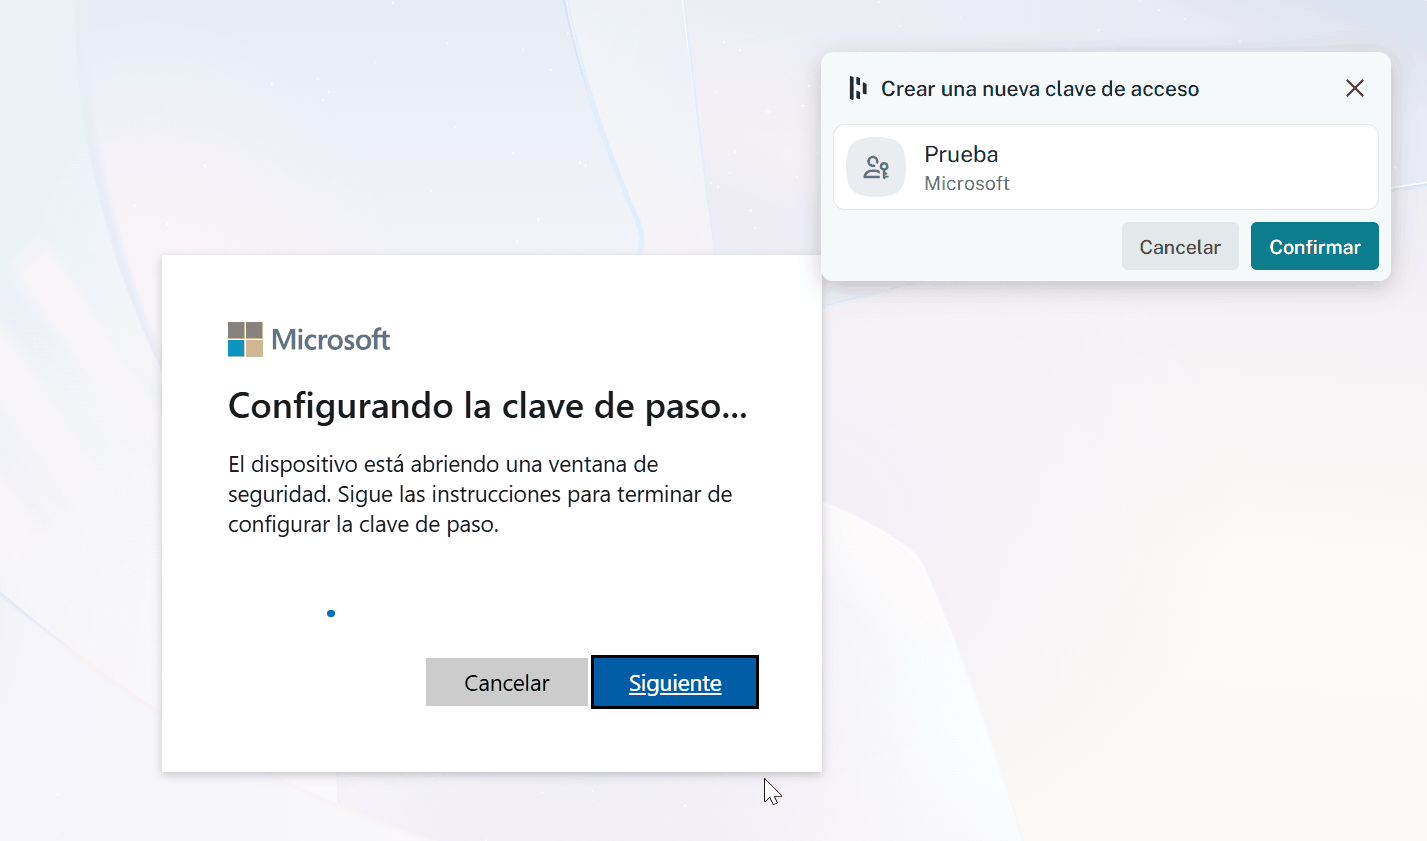
On Android, a passkey is only usable from the profile where it was created. Anyone with both a personal and a work profile needs to create the passkey in each profile to use it in both.
6.4. Confirm it registered correctly
The Security info page doubles as the check, and this is the part worth showing users so they can tell what they actually have:
- The entry reads Passkey (Synced) with the provider name underneath: Dashlane. If it said device-bound, you'd be looking at something else.
- Expanding the row with the arrow on the right reveals the passkey's AAGUID. That settles which provider stored it: if it starts with
531126d6, it's Dashlane.
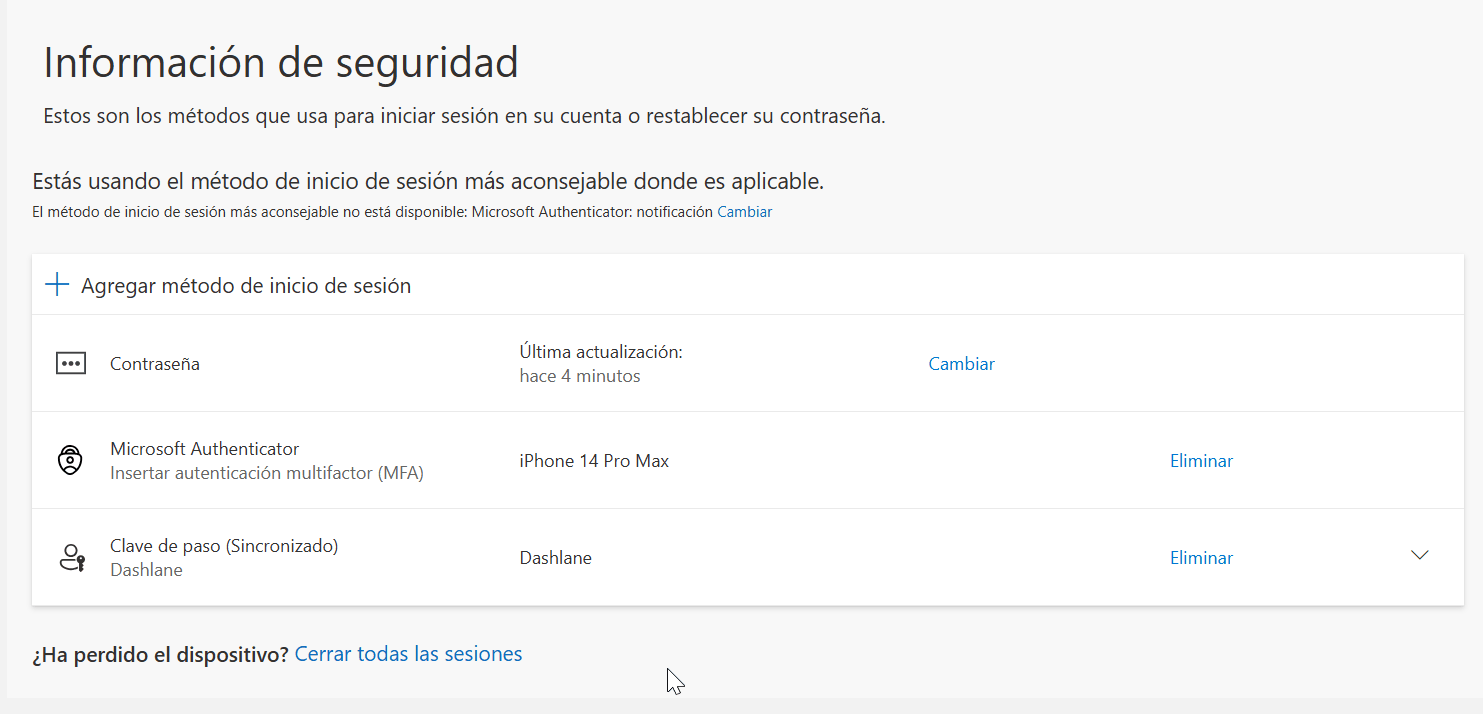
That visible AAGUID is also the quickest way to obtain the identifier for any new provider: register a passkey on a test account, expand the row and copy the value.
6.5. What sign-in looks like
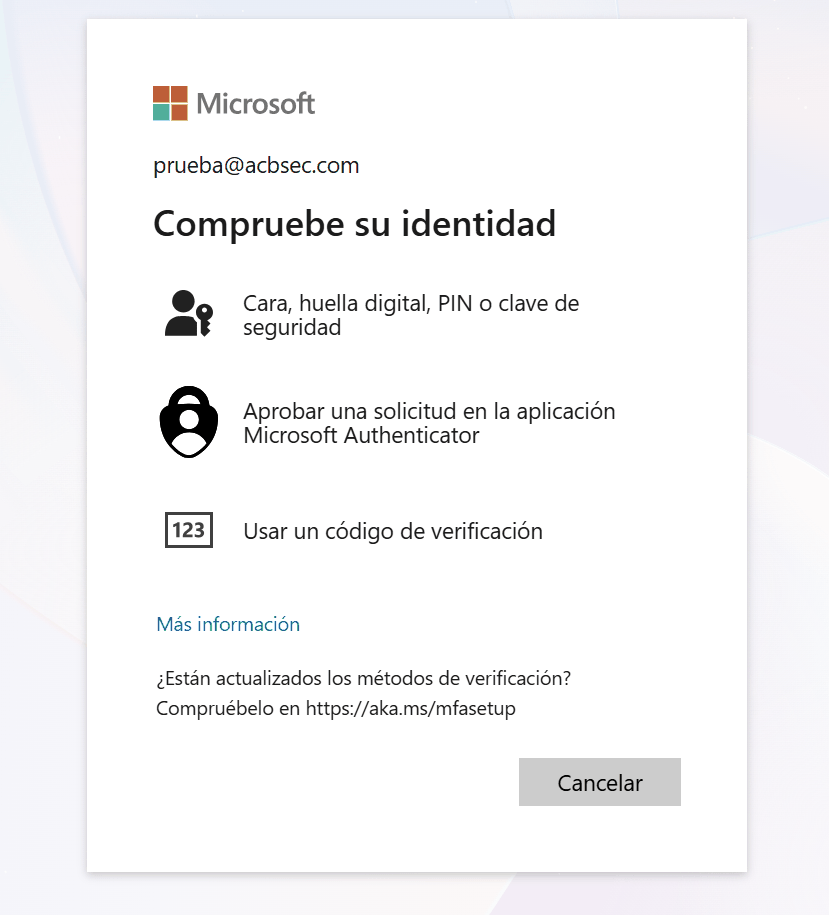
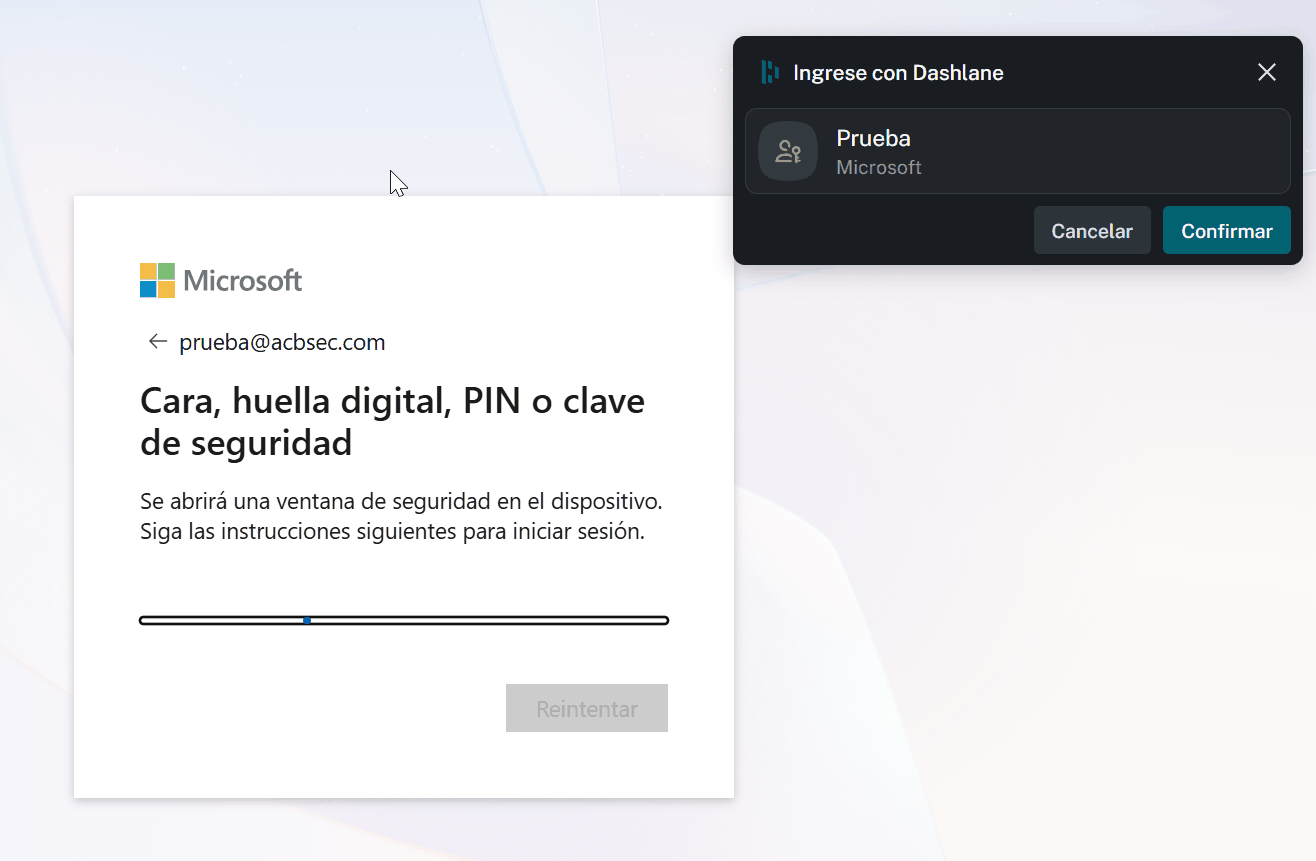
Worth knowing this screen, because it's the one that generates service desk questions. Microsoft shows its Face, fingerprint, PIN or security key dialog and, on top of it, Dashlane opens its own prompt with the account and a confirm button. The user confirms in Dashlane and the session continues.
Step 7. Temporary Access Pass for bootstrapping
There's a chicken-and-egg problem left: registering a passkey requires passing MFA, and a user without a strong method yet can't do that. The Temporary Access Pass (TAP) solves the bootstrap, and the recovery case when someone loses their phone.
- Go to Entra ID › Authentication methods › Policies and select Temporary Access Pass.
- Enable it and choose which users or groups it applies to.
- Under Configure, adjust lifetime and format if needed.
| Setting | Default | Allowed range |
|---|---|---|
| Minimum lifetime | 1 hour | 10 minutes – 30 days |
| Maximum lifetime | 8 hours | 10 minutes – 30 days |
| Default lifetime | 1 hour | 10 minutes – 30 days |
| One-time use | False | True / False |
| Length | 8 characters | 8 – 48 characters |
To issue one: Entra ID › Users, the user, Authentication methods, Add authentication method, Temporary Access Pass. The code is shown once only, so copy it before closing the dialog.
With a one-time pass, registration of the passwordless method must be completed within ten minutes of sign-in. It isn't a TAP limitation: it's how long MFA stays valid during credential registration, and it applies equally from Security info.
If the process includes enrolling the device before registering the passkey, that window is usually blown. A multi-use pass, or two one-time passes, is the way round it.
Each user can hold only one active pass, and a new one replaces the old. In federated domains the pass takes precedence over federation: the user completes authentication in Entra ID and isn't redirected to their identity provider.
Step 8. Registration campaign
The registration campaign nudges users to register a passkey right after they complete MFA, so they don't have to go looking for where it's done. It needs no paid licence, but it does require MFA to be Microsoft Entra MFA.
- Go to Entra ID › Authentication methods › Registration campaign and select Edit.
- Under State, choose Enabled to control the settings yourself, or Microsoft managed to accept the recommended defaults.
- Under Authentication method, select Passkey.
- Set Days allowed to snooze (0 to 14) and Limited number of snoozes.
- Include or exclude the relevant groups and save.
With Limited number of snoozes enabled, a user can postpone three times and registration is required on the fourth. Disabled, they can snooze indefinitely — which in practice means part of the workforce never will. The snooze count is tracked per user and survives campaign configuration changes.
A campaign can only target one method at a time: Authenticator or passkeys, never both in the same tenant.
This is the least obvious interaction in the whole guide. Under Microsoft managed mode, a user doesn't see the nudge if their passkey profile carries any of these restrictions:
- Synced only.
- Device-bound only.
- Attestation enforced.
- AAGUID restrictions.
In other words: the restrictive profile from step 3 and the automatic campaign cancel each other out. On top of that, if your tenant already targets specific AAGUIDs in the policy, Microsoft managed mode won't switch the targeted method to passkeys. For those groups, set the state to Enabled and configure the target by hand.
Another detail that confuses testing: the nudge is evaluated per device-and-browser combination, not per account. A user with Windows Hello for Business isn't nudged on Windows, but is when signing in from a Mac with Chrome, because that credential doesn't apply on that platform. On Linux there's no nudge at all, because FIDO2 passkeys aren't available there.
Step 9. Requiring passkeys with Conditional Access
Enabling the method permits it; requiring it is a different job, and it's the part that needs Entra ID P1.
- Go to Entra ID › Authentication methods › Authentication strengths as a Conditional Access Administrator.
- Select New authentication strength and name it.
- Tick Passkeys (FIDO2).
- To restrict it to a specific model, go to Advanced options › Add AAGUID and enter the identifier.
- Review and save, then reference that strength from the grant control of a Conditional Access policy.
If you create a policy requiring phishing-resistant authentication for All resources, a user without a passkey yet gets trapped: registering one in Authenticator requires signing in to Authenticator, which requires a passkey.
Ways out: filter for applications instead of targeting all resources, or split the policy in two — one for desktop that requires a passkey, one for mobile that also accepts a Temporary Access Pass. With the second, the user signs in to Authenticator with the pass and registers the passkey without looping.
Same caution with Require approved client app and Require app protection policy: Authenticator doesn't support those controls on iOS or Android, so affected users can't register passkeys. And in every case, users must also satisfy any policy targeting Register security information, or registration won't complete.
Step 10. Verify the rollout
Three checks, from broadest to narrowest.
Activity report
Entra ID › Authentication methods › Activity, with two tabs: Registration and Usage. The first tells you how many users are capable of passwordless authentication and which methods they have registered; the second, what's actually being used to sign in. It requires Entra ID P1 or P2 and a role with report-reading permissions.
Two limits: data lags by up to 36 hours, and disabled or soft-deleted users don't appear.
Per-user check
Entra ID › Users, the user, Authentication methods. Each registered passkey is listed with its details, including the AAGUID — which is how you confirm whether someone registered with the intended provider. To remove a credential, right-click the method and select Delete.
Sign-in test
With a test account in each profile: register an allowed passkey, register one the policy should reject, and sign in with the allowed one. If the second case doesn't fail, the policy isn't doing what you think it is.
Limitations and known issues
Guest users
Passkey registration isn't supported for internal or external guests, including B2B collaboration users in the resource tenant. They aren't nudged by passkey registration campaigns either.
UPN changes
If the user principal name changes, existing passkeys can't be modified. The user has to go to Security info, delete the old passkey and register a new one. Worth planning for in any domain rename project.
Ten profiles and 20 KB
The real ceiling is usually policy size rather than the number of profiles. If you run short of granularity, combine profiles with Conditional Access authentication strengths, which accept AAGUIDs per policy.
Security info registration
Users in scope for the SSPR registration policy or the ID Protection MFA registration policy are sent to the interrupt mode of combined registration, which currently doesn't support FIDO2 or phone sign-in registration.
The order I recommend
For a production rollout, this sequence generates the fewest incidents:
-
Week 1
Test tenant
Profiles, attestation and AAGUIDs against test accounts. This is where you break things on purpose: register a passkey the policy should reject and confirm it actually rejects it.
-
Week 2
IT pilot
The group that knows how to report a fault properly. Temporary Access Pass enabled and a direct channel for registration issues.
-
Weeks 3 to 6
Registration campaign
Group by group, not everyone at once. With limited snoozes from the start: extending the deadline is easy, recovering someone who has ignored the nudge ten times isn't.
-
Once coverage is high
Enforce with Conditional Access
Privileged accounts first, everyone else after. Enforcing before coverage exists is the fast route to locking people out on a Monday morning.
This guide connects directly with the retirement of SMS and voice call in Entra ID: from 1 February 2027, anyone whose only MFA method is SMS or voice hits a blocking prompt to register a passkey. Everything above is what needs to be in place before that date.
If any step doesn't behave as described, write to me and I'll review it. Guides age better when they get corrected.
Enable passkeys (FIDO2) in Microsoft Entra ID — Microsoft Learn · Enable passkeys in Microsoft Authenticator — Microsoft Learn · Registration campaign — Microsoft Learn · Temporary Access Pass — Microsoft Learn · Authentication methods activity — Microsoft Learn · Community AAGUID list — GitHub · FIDO Alliance metadata service.
Version 1.0, verified in August 2026. Third-party AAGUIDs come from the community list and may be extended: always confirm the identifier by registering the provider on a test account before putting it in a production policy.
To connect these controls with identities, applications, data and exceptions, read the Microsoft 365 security assessment guide. It explains which evidence to review and how to prioritise improvements.